Team-based learning is a pedagogical approach that facilitates learning through individual testing and group collaboration. Students are first given time to work on answers individually using the Individual Readiness Assurance Test (iRAT). They then work in teams to discuss the same problems in order to arrive at a consensus and check their answers against a pre-filled MCQ scratch card that reveals if their selected answer is correct or wrong, after which an immediate feedback is given. This is known as the Team Readiness Assurance Test (tRAT). If they got the answer wrong, teams get a chance to either appeal their answer or to try the same question again. A clarification session then ensues, with teachers focusing more on questions that teams have difficulty in.
Schools that want to use Team-Based Learning might either subscribe to platforms that allow for repeated attempts such as InteDashboard or purchase the Immediate Feedback Assessment Technique (IF-AT) scratch cards. There are some free options such as that from Cosma Gottardi.
However, I was wondering if a simple one could be done with Google Form, using the quiz mode together with branching options, to achieve the same results. I tested it out immediately last night and came up with this proof-of-concept. It seems possible and easy to edit.
I created a template for anyone who is keen to try:
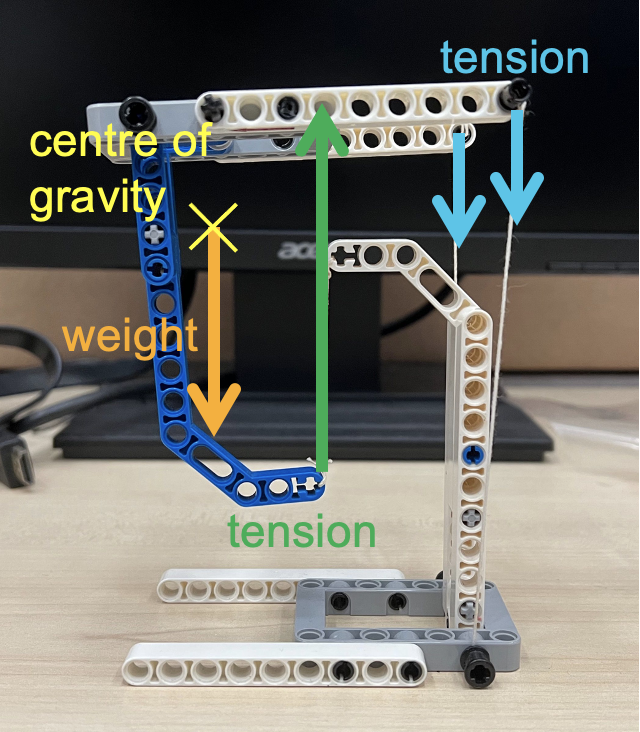
There is a new internet trend called “tensegrity” – an amalgamation of the words tension and integrity. It is basically a trend of videos showing how objects appear to float above a structure while experiencing tensions that appear to pull parts of the floating object downwards.
In the diagram below, the red vectors show the tensions acting on the “floating” object while the green vector shows the weight of the object.
The main force that makes this possible is the upward tension (shown below) exerted by the string from which the lowest point of the object is suspended. The other tensions are downward and serve to balance the moment created by the weight of the object. The centre of gravity of the “floating” structure lies just in front of the supporting string. The two smaller downward vectors at the back due to the strings balance the moment due to the weight, and give the structure stability sideways.
This is a fun demonstration to teach the principle of moments, and concepts of equilibrium.
The next image labels the forces acting on the upper structure. Notice that the centre of gravity lies somewhere in empty space due to its shape.
Only the forces acting on the upper half of the structure are drawn in this image to illustrate why it is able to remain in equilibrium
These tensegrity structures are very easy to build if you understand the physics behind them. Some tips on building such structures:
Make the two strings exerting the downward tensions are easy to adjust by using technic pins to stick them into bricks with holes. You can simply pull to release more string in order to achieve the right balance.
The two strings should be sufficiently far apart to prevent the floating structure from tilting too easily to the side.
The centre of gravity of the floating structure must be in front of the string exerting the upward tension.
The base must be wide enough to provide some stability so that the whole structure does not topple.
Here’s another tensegrity structure that I built: this time, with a Lego construction theme.
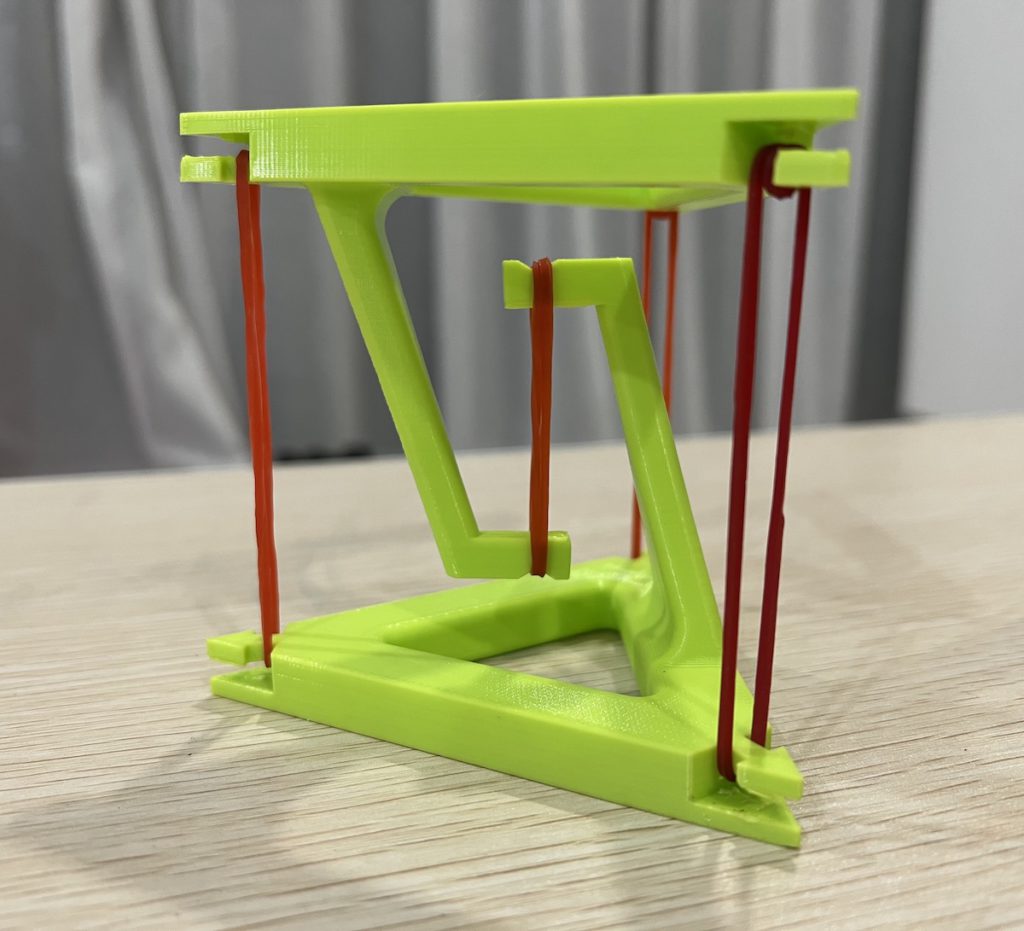
Apart from using Lego, I have also 3D-printed a tensegrity structure that only requires rubber bands to hold up. In this case, the centre of gravity of the upper structure is somewhere more central with respect to the base structure. Hence, 3 rubber bands of almost equal tension will be used to provide the balance. The STL file for the 3D model can be downloaded from Thingiverse.com.
The main challenge in assembling a tensegrity structure is the adjustment of the tensions such that the upper structure is balanced. One way to simplify that, for beginners, is to use one that is supported by rubber bands as the rubber bands can adjust their lengths according to the tensions required.
3D-printed tensegrity table balanced by rubber bands
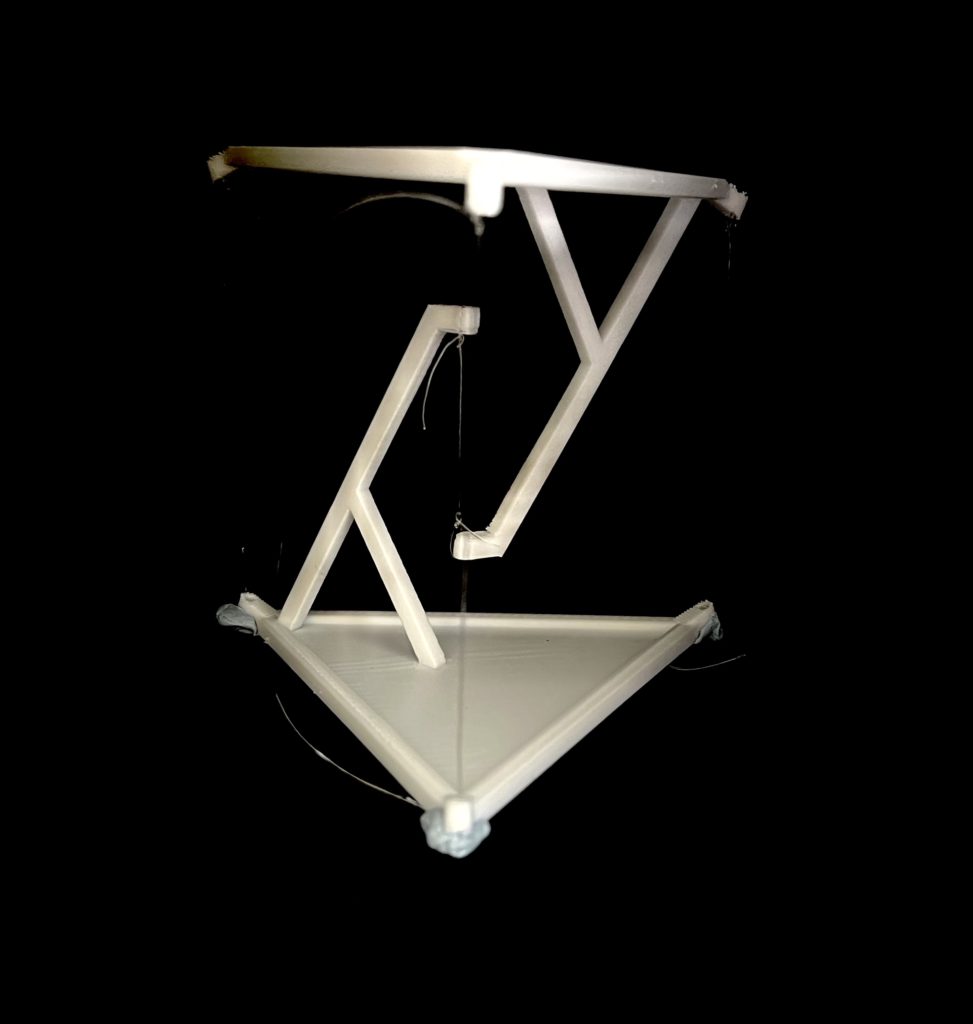
Another tip is to use some blu-tack instead of tying the knots dead such as in the photo below. This is a 3D printed structure, also from Thingiverse.
3D-printed tensegrity table held up and balanced by nylon string
(This post was first published on 18 April 2020 and is revised on 24 August 2022.)
I had the pleasure of making the acquaintance of a fellow Singaporean physics teacher who has also created his own website to host his teaching and learning resources at ThePhysicsGrove.com. He had managed to complete coverage of the O level Physics syllabus in a series of YouTube videos and I see that he is also creating Google Quizzes, Quizzizz and Kahoots for some topics.
I thought this will be a good opportunity to list down the various websites that I have been following because students will find them useful as well. Among the authors are Evan Toh (whom I met at ICTLT), a talented artist who infused comic drawing in the explanation of physics concepts, and Lawrence Wee, a friend and mentor who got me started on making javascript simulations.
XMPhysics (for A-level students) – by Hwa Chong Institution teacher, Chua Kah Hean at https://xmphysics.com
I feel that it is necessary to maintain this list because a casual search for Physics websites in Google will return the dozens of tuition service providers (some of which are run by my ex-colleagues!) rather than these free-to-use learning resources that have been created. Hopefully with these backlinks, Google’s search algorithm will direct more traffic to such websites in future, although I still don’t think we can compete against the competitive tuition industry in terms of search engine optimisation. At least, one can find them through this page.
If you happen to come across any other similar websites, please leave a comment below or let me know personally if you know me.
To incorporate elements of the Nature of Science in our teaching, we often talk about some of the scientists who have contributed to the discoveries that led to an understanding of the universe, the circumstances and constraints they face, and their attitudes and values. This is an incomplete list of some of the scientists who have their names prominently featuring either as a unit of measure or in a law of physics, classified by the A-level topics. I am compiling this as a quick reference for lesson planning purposes.
Dynamics
Sir Isaac Newton (1643-1703 English) – Newton’s laws of motion, Newton’s law of gravitation
Forces
Archimedes of Syracuse (287-212 BC Greek) – principle of the lever, law of buoyancy
Robert Hooke (1635-1703 English) – Hooke’s law
Energy, Work and Power
James Watt (1736-1819 Scottish) – improved efficiency of steam engines
James Prescott Joule (1818-1889 English) – discovered mechanical equivalent of heat
Thermal Physics
Anders Celsius (1701-1744 Swedish) – proposed (an inverted form of) the Centigrade temperature scale
Robert Brown (1773-1858 Scottish) – botanist who observed Brownian motion
Amedeo Avogadro (1776-1856 Italian) – formulated Avogadro’s law
Lord Kelvin (1824-1907 British) – formulated first and second laws of thermodynamics
Ludwig Eduard Boltzmann (1844-1906 Austrian) – statistical explanation of second law of thermodynamics, defined entropy
Wave Motionand Superposition
Étienne-Louis Malus (1775-1812 French) – discovered polarization of light by reflection, double refraction of light in crystals
Wilhelm Conrad Röntgen (1845-1923 German) – discovered X-rays by accident
Heinrich Hertz (1857-1894 German) – proved the existence of the electromagnetic waves
Lord Rayleigh (1842-1919 English) – Rayleigh’s criterion for angular resolution
Electric Fields, Current Electricityand DC Circuits
Charles-Augustin de Coulomb (1736-1806 French) – discovered Coulomb’s law
Count Alessandro Volta (1745-1827 Italian) – invented first electric battery
Andre Marie Ampere (1775-1836 French) – electrodynamics
Georg Ohm (1789-1854 German) – discovered that current flow is proportional to p.d. and inversely proportional to resistance
Benjamin Franklin (1785-1788 American) – discovered principle of conservation of charge, kite experiment
Electromagnetism
Hans Christien Oersted (1777-1851 Danish) – discovered that electric currents create magnetic fields
Sir John Ambrose Fleming (1849-1945 English) – professor of electrical engineering, establised right-hand rule
Electromagnetic Induction
Michael Faraday (1791-1867 English) – discovered principle of electromagnetic induction
Heinrich Friedrich Emil Lenz (1804-1865 German) – formulated Lenz’s law
Alternating Current
Nikola Tesla (1856-1943, Austrian/American) – designed modern AC supply system
Modern Physics
Max Karl Planck (1858-1947 German) – quantum theory
Albert Einstein (1879-1955 German/Swiss/American) – mass-energy equivalence, photoelectric effect, etc.
Louis de Broglie (1892-1987 French) – wave nature of electrons
Werner Karl Heisenberg (1901-1976 German) – pioneer in quantum mechanics, uncertainty principle
Nuclear Physics
Henri Becquerel (1852-1908 French) – discovered evidence of radioactivity
Pierre Curie (1859-1096 French) – pioneer in radioactivity
Marie Curie (1867-1934 Polish/French) – pioneer in radioactivity, only woman to win Nobel Prize twice
Wanted to try out a different way of creating simulations. Added the acceleration-time graph in place of his energy-time graph, in preparation for the teaching of kinematics. Also assuming no energy loss during collisions for simplicity.
For Singapore teachers, I have submitted a request to SLS for this URL to be whitelisted for embedding. Once approved, glowscript simulations can be embedded as part of the lesson. For the time being, a URL link out to the simulation will have to do.
This is a simple virtual experiment with a 3D view, allow teachers to explain the simple concepts of an oscillation experiment, such as which view is best to measure timing of the oscillation from.
To access this simulation directly via GeoGebra, go to : https://www.geogebra.org/m/d3yxgjfp
To embed it in SLS or other platforms, use the following code: