Blog

Musings

Review of Sci-sational Christmas at Science Centre Singapore

In a nutshell, Sci-sational Christmas offers value-for-money interactive family festive fun.

Open from 1 to 25 Dec 2019 at the Annexe of Science Centre Singapore, visitors will enter 3 main activity zones:

Zone 1: Hot vs Cold Experiments

Watch as two “elves” try to outdo each other by performing scientific demonstrations based on opposing ends of the temperature range – under very carefully controlled conditions of course.

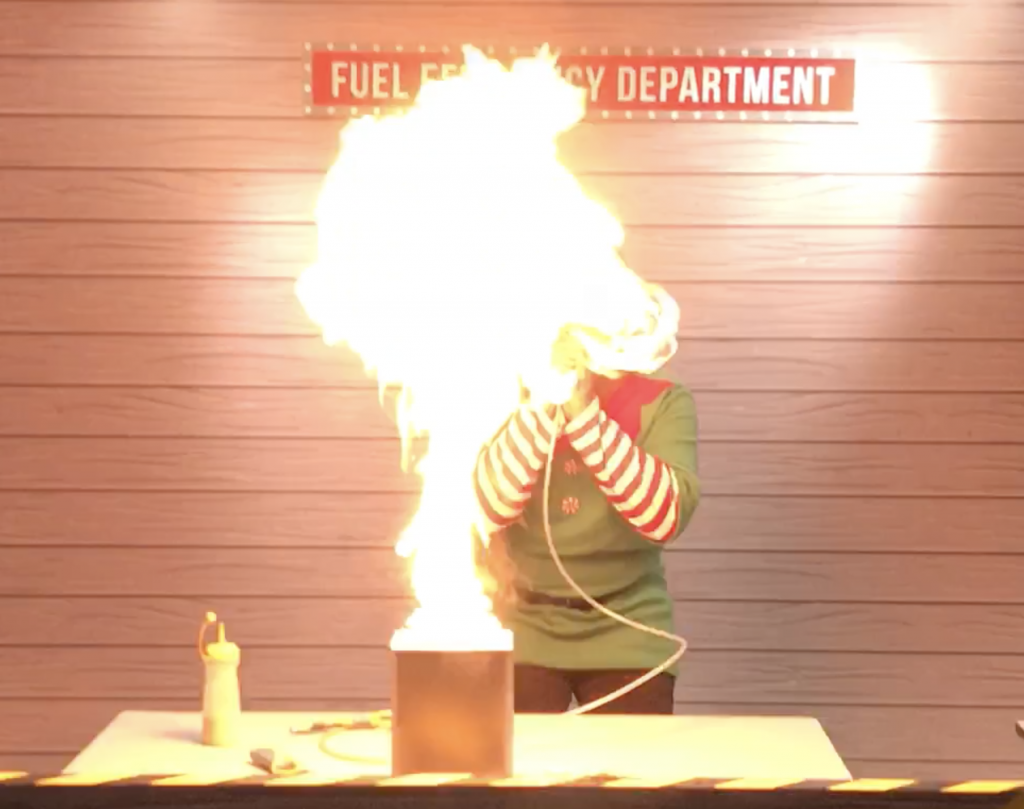
The number of asterisks show the loudness of the explosion. The heat experiments in the “Fuel Efficiency Department” are:

  1. Lighting of a hydrogen balloon (**),
  2. Lycopodium powder combustion (*), and
  3. Ethanol-powered propulsion (***)

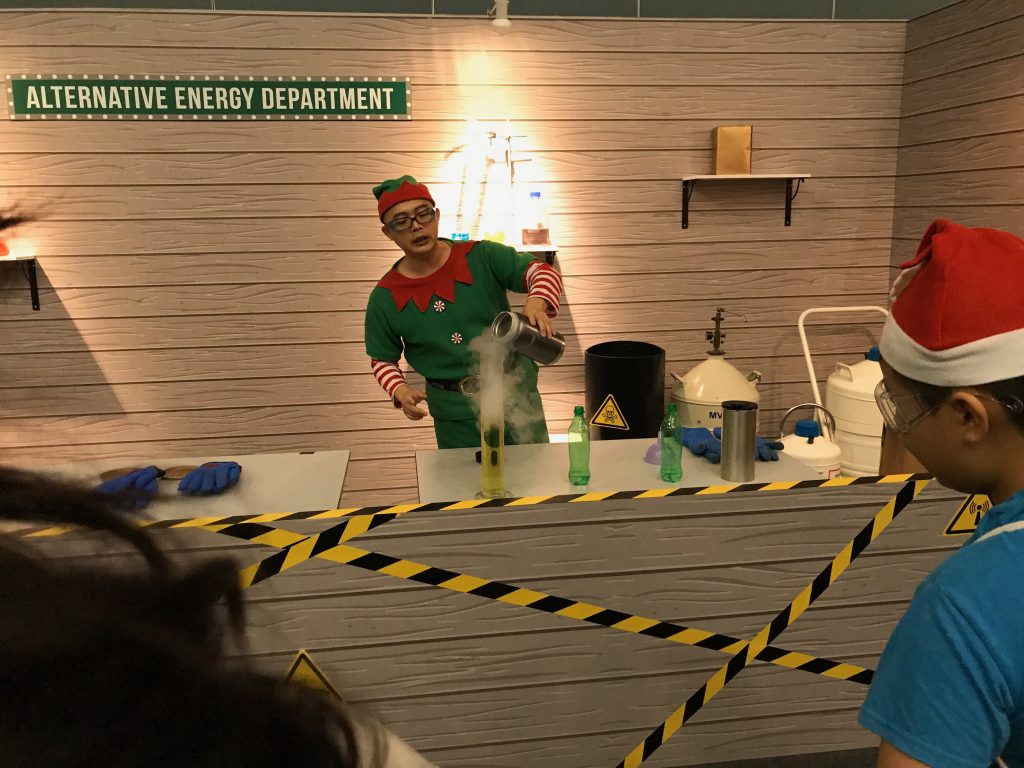
Over at the “Alternative Energy Department”, the elf tried to impress us with:

  1. Boiling of liquid nitrogen, increasing gas pressure to burst a balloon (***),
  2. Liquid nitrogen propelled plastic bottle rocket (*), and
  3. Liquid nitrogen cloud formation with hot water

To me as a science teacher, these experiments would have made the tickets worth the money already. After all, demonstrations like these are usually the highlight of science museums all over the world. But there are more…

Zone 2: Scented Candle Making

After exiting the first workshop, visitors are brought to the candle making workshop. We were each given a rubber mould, some melted soy wax, colouring and a few drops of liquid scents to make our own Christmas tree candles.

Do take care not to add too much colouring or the tree may not freeze evenly and hence, break easily. On hindsight, I should have used mainly non-coloured wax with a little green colouring for the base of the candle (to pour in last) to get a snow-covered Christmas tree.

Zone 3: Escape Room

The escape room offers plenty of fun for the kids in the group. There are clues planted all over Santa’s office and the session is facilitated by an “elf”. The aim is to unlock a number lock under the fireplace in the office for the kids to crawl out from.

There is a secret door for the grown-ups, though, so we need not worry about our outfit or painful knees.

The only downside is that visitors are placed in groups of 15-20, most of whom are strangers – unless you register as a big group of friends. However, most kids would often get quite involved and interactive despite not knowing one another.

I highly recommend this activity for families with kids aged 5-12. At a price of $15 that includes general admission to the Science Centre, it is far more worthwhile than a conventional escape room experience in Singapore and is something my own kids find meaningful and exciting.

I have a feeling that the Science Centre might organise more escape-room styled activities in future as they are quite the craze nowadays.

Visitors might want to note that the 3 zones would last a total of about 50 min. The entry timings are: 11AM, 12NOON, 1:30PM, 2PM, 2:30PM, 3PM, 3:30PM, 4PM and 4.30PM. You will need to indicate your preferred timing when purchasing the ticket and show up on time at the entrance, which is near the fire tornado exhibit.

one-north Festival 2019

https://www.seriouslyscience.sg/one-north-Festival/Overview

Happening now from 13-14 Sept 2019 at one-north.

My colleagues and I took the opportunity to visit the exhibitions during lunch time today. I learnt about 3M’s solar films and retroreflection material, I^2R’s speech-to-text recognition app with code switching capabilities (i.e. the app is able to transcribe English-Chinese mixed sentences) and cell-based prawn meat from https://shiokmeats.com/, among other things.

There was also an informative booth on Project Wolbachia (where male aedes mosquitoes infected with Wolbachia bacteria are released into the wild to control the population). I learnt that they could separate the male from the females at the pupal stage because male pupals are larger and got to stick my hand in a box full of male Wolbachia-Aedes mosquitoes.

Very hands-on booth on Project Wolbachia.
Looking forward to a future where meat is grown in labs so as to reduce animal suffering

Do check out the apps developed by the Bioinformatics Institute that can be used for science experiments or related applications.

Iconic Voices from MIT: Opening a New Window into the Universe with Dr Nergis Mavalvala

This is a free public lecture by Dr Nergis Mavalvala (an astrophysicist from MIT) on how her team detected gravitational waves generated from colliding black holes and neutron stars at the Laser Interferometer Gravitational-wave Observatory (LIGO).  Held on this coming Friday 26 Jul 2019 from 5 to 6 pm, the venue is at the Singapore University of Technology and Design (SUTD)’s Auditorium, along 8 Somapah Road, Singapore 487372.

Click here to sign up.

Updates

I have not been posting in this blog for a while as I have been rather busy in my new role at the Ministry of Education HQ. My main area of work is related to the Singapore Student Learning Space, an online portal in which curriculum-aligned resources are made available for students in Singapore to learn anytime, anywhere. It’s about to be rolled out to all non-pilot schools soon, so I won’t be posting here for a while longer.

Until then, please let me know if there are any simulations or resources that you would like me to work on. Any such work will have to be during my free time, somewhere between rest and family time.

Water Wheel Challenge

My school organises a competition for upper primary pupils in Singapore annually. Called the THINK Challenge, it gets participants to engage in problem-solving with a little help from the internet, team work and experimentation. “THINK” stands for the stages of the cycle of inquiry learning: Trigger, Harness, Investigate, Network and Know.

In this year’s Challenge, participants were tasked to construct a water wheel that is able to lift a 20g mass up a height of 30cm. This task is known as the “Trigger”. Participants were given 30 min on the internet to gather information while also “harnessing” their prior knowledge on energy conversions, frictional force, etc.

They were then given time during the “Investigate” phase to experiment and test out their prototypes. Our student facilitators then assisted to test the efficiency of their prototypes based on the amount of water used to lift the mass over the required distance.

In the “Network” phase, participants had to make a short presentation in front of a panel of judges, explaining the scientific principles involved, design considerations, limitations and suggestions for improvement.

Finally, the competition was wrapped up with a brief summary of the learning points in the “Know” stage just before handing out the prizes.

The winning teams this year were:

1st place: Maha Bodhi Primary School Team 1
2nd place: Bedok Green Primary School Team 1
3rd place: Haig Girls’ School Team 1

What Makes a Good Water Wheel?

Through this competition, we hoped that participants picked up new scientific knowledge through the inquiry-learning approach.

Some of the considerations needed when constructing and testing the water wheel include:

  1. Ways to reduce friction. Most participants realise early on that they need to allow the axle of the water wheel to turn with minimal friction. This means that they need to insert the chopstick given to them into a straw, and affix the water wheel to the straw while clamping the chopstick to a retort stand (a requirement for the competition). They also need to ensure that the string does not end up winding around the chopstick.
  2. Mass of water wheel. A heavy water wheel tends to be harder to turn due to a larger moment of inertia as well as greater friction at the axle.
  3. Finding an optimal height to pour the water from. They were given a bottle to pour out the water from and were allowed to pour the water from any height. While it makes sense to pour the water high above the wheel initially to achieve maximum gravitational potential energy, it was also resulting in inaccuracy and needless splashing of water.
  4. The type and arrangement of the water “buckets”. The buckets for carrying water in order to turn the wheel can be made of disposable cups or spoons, and should be arranged in regular intervals to ensure smooth rotation of the wheel. There has to be an optimal number of such buckets because if they are spaced too far apart, the lifted mass will turn the water wheel back in the opposite direction whenever the buckets are not doing work.

    This water wheel from Haig Girls’ School used only 201 g of water
  5. The position at which to tie the string to the weight. The mass to be lifted is attached to a string and this string has to be fixed to the turning wheel. If the string is tied too close to the circumference of the wheel, there may not be sufficient torque to lift the weight. If the string is too close to the axle, it will require more turns in order to lift the weight by the requisite height. The winning team managed to create an optimal distance between the string and the axle by using ice cream sticks.

The winning water wheel from Maha Bodhi School used only 123 g of water.

Concrete to Abstract

As I was teaching the use of the potential divider equation to my IP4 (Grade 10) students last week, I approached it by teaching the rules first before showing worked examples. Thereafter, as some students remained confused, I merely reverted to explaining the rules. Eventually, I resorted to simplifying the equation by substituting simple numerical values in place of the multiple symbols that we use for emf, terminal p.d., resistance (more than one of them) and current, and many students’ eyes lit up. It struck me then that I should have used the Concrete-Representational-Abstract approach in the first place.

Concrete-Representational-Abstract in Singapore Maths
Potential Divider Worksheet
Incidentally, I was reminded of this approach while helping my daughter with her Primary 2 Math homework last week. Since she was absent due to a stomach flu for 3 days this week, she had to bring work home to complete. There was an exercise on subtraction of numbers by separating into hundreds and tens and the first question looked like this:

There I was stuck at a primary school problem, not because I did not know that final answer is 157 but because I was not sure what to fill in for the circles. It did not help that my daughter was not clear about what to do either.

I then looked at her textbook for examples and what I saw was pictures of blocks in groups of 100s and 10s that look like this:

These are the tools that students in her class would have played with in the concrete or representation stage of learning. They can physically manipulate the blocks in order to do subtraction, which can be fun for those who like learning with a hands-on activity.

The abstract stage required by the question is for students to

  1. remove 100 from the first number 207, leaving 107 (so the two circles will have numbers 100 and 107 in them)
  2. deduct the second number from 100
  3. and add the difference back to 107.

This is a technique that allows students to make quick mental calculations when subtracting tens from numbers more than 100 but requires a fair bit of practice to get used to. My daughter eventually had no problem with the rest of her homework after we figured this out.

Being a Physics teacher, I thought about how I could transfer this method of making a complex and abstract skill easier to pick up through concrete representations.

Usual Approach: Abstract to Concrete

In my IP4 Physics classes, we are currently on the topic of DC circuits, which involves calculations involving the potential divider method.

One of the main equations is the potential divider rule, in which V1 (p.d. across resistor R1) is given by

$V_1=\dfrac{R_1}{R_1+R_2}\times\epsilon$

For two classes, I started directly with equations before introducing examples (abstract to concrete), which is what physics teachers usually do. There is nothing wrong with this approach as students still see a concrete representation eventually but I was wondering if it might be more beneficial if students could synthesize the equation on their own by generalizing from examples. By the time I taught this same concept to the second class, I realized that most students were able to understand the equation only after giving concrete examples using numerical values.

Concrete Examples before Equations

For my third class, after being inspired by my daughter’s homework, instead of introducing the equations straightaway, I started by introducing the concept of dividing emf between two resistors in series according to ratio of resistance. I used simple numbers for easier reference. In this way, I felt that students could then always link the equation back to the simple concept of ratios which helps them understand the intent of the equation.

When students see after one or two examples that all we are doing is trying to distribute the emf in proportion to the resistance that each resistor has so that it follows the ratio R1:R2  (concrete stage),  I asked them to replace the numerical values with symbols (representation stage).

$\dfrac{1\Omega}{2\Omega}=\dfrac{4 V}{8V}$ or $\dfrac{1\Omega}{(1+2)\Omega}=\dfrac{4 V}{(4+8)V}$
(Concrete stage)

$\dfrac{R_1}{R_2}=\dfrac{V_1}{V_2}$ or $\dfrac{R_1}{R_1+R_2}=\dfrac{V_1}{V_1+V_2}$
(Representation stage)

From the last equation, students were asked to recall that emf is equal to the sum of the p.d. in the series circuit. The equation can then be rewritten as

$\dfrac{R_1}{R_{total}}=\dfrac{V_1}{\epsilon}$ or $V_1=\dfrac{R_1}{R_{total}}\times\epsilon$
(Abstract stage)

I believe that if students can arrive that the final equation from the basic principles, they will understand more deeply and will be able to apply it in slightly different contexts, such as when there are more than 2 resistors in series, or when one resistor is varying (in the case of transducers such as LDRs and thermistors) or even when considering internal resistance of the cell.

Here’s a simple worksheet that students can use to work out the potential divider equation on their own.

P.S. This is not a research study that compares whether abstract to concrete is better than the other way round, but merely a way for me to record what I’ve tried in different classes. I welcome comments from other teachers who may have tried a similar approach and have observed positive results.