03 Motion and Forces

Bouncing ball with energy loss

Open in new tab 🔗

This simulation offers a clear and interactive way to explore the motion of a ball bouncing on the ground, highlighting how displacement, velocity, and acceleration change over time. On the left, you’ll see the animation of the ball with vectors showing its position (green), velocity (pink), and acceleration (blue). The sliders at the top allow you to adjust the starting height, the percentage of energy lost on each bounce, and whether air resistance is included. You can pause, reset, or let the motion run continuously, while the time slider doubles as a scrubber when the simulation is paused.

On the right, the three graphs display how each physical quantity varies with time. The position–time graph shows the ball’s vertical displacement, always measured relative to the lowest point of its center of mass. The velocity–time graph alternates between negative and positive values, reflecting the downward and upward motion during each bounce, while the acceleration–time graph remains mostly constant at –g, with spikes at the moment of collision. Together, the animation and graphs help link the visual motion with the quantitative data, reinforcing the relationships between these variables.

The underlying theory follows Newton’s laws of motion. The ball accelerates downwards under gravity until it collides with the ground, where it loses some energy depending on the restitution factor. This is why the bounce height diminishes over time. The velocity vector shows not only the speed but also the direction of motion, while the acceleration vector indicates that gravity always acts downward, regardless of whether the ball is rising or falling. By adjusting energy loss during each collision and air resistance, you can model more realistic scenarios and see how dissipative forces affect motion, making this a powerful tool to visualize the physics of bouncing objects.
Dropping with air resistance

Open in new tab 🔗

This simulation lets you watch two equal-size spheres (light and heavy) fall, while you see their free-body diagrams (FBDs) and a velocity–time graph update in real time.

Press Start to run and Pause to discuss a moment in time. Reset restarts from rest. Use Zoom to read the force vectors clearly. Toggle Air Resistance to compare an idealised fall (no drag) with a more realistic one (drag on). The small info panel shows the current speeds and, when drag is on, each sphere’s terminal velocity.

What to look for

  • Without air resistance: Each FBD shows only weight downward. Acceleration is constant at ggg, so the velocity–time graph is a straight line from the origin for both spheres (same slope, because mass doesn’t matter when no drag acts).
  • With air resistance: A drag arrow appears upward and grows with speed. The heavy sphere’s velocity rises faster at first (its weight is larger), but both curves flatten as drag increases, and the acceleration vector shrinks toward zero. Dotted segments indicate when the two curves overlap closely.

Theory in one breath

In air, we model drag as proportional to speed: $F_\text{drag}=kv$

Net force is $ma=mg−kv \quad\Rightarrow a=g−\dfrac{k}{m}v$

As v grows, the term $\dfrac{k}{m}v$ eats into $g$, so acceleration falls.

Terminal velocity happens when forces balance: $mg=kv$​, so $v_t=\dfrac{mg}{k}$

Heavier mass ⇒ larger $v_t$​. That’s why the heavy sphere ultimately settles at a higher speed and takes longer to level off. With drag off, the model is simply $a=g$ and $v=gt$.

How to teach with it (fast)

  1. Start with Air Resistance off: Pause after a second—ask why both lines match and why only weight appears on the FBDs.
  2. Turn Air Resistance on: Run, then pause midway. What changed in the FBDs? Why is acceleration smaller now?
  3. Let it run until the acceleration vectors nearly vanish: connect “flat graph” with “balanced forces,” then read off different terminal velocities.

That’s it: start, pause, notice which vector changed, and link the picture to the equation.

Simulation of Projectile Motion with Air Resistance

Open in new tab 🔗 This simulation offers a hands-on and dynamic way to explore the physics of projectile motion with and without air resistance. By adjusting parameters such as launch velocity, angle, and air resistance, users can visualize how these factors affect the shape and reach of a projectile’s trajectory. The app provides real-time changes including motion paths, velocity vectors, and a velocity-time graph showing horizontal and vertical components separately. It also calculates and displays key quantities such as maximum height and range under ideal and non-ideal conditions (based on an arbitrary coefficient of drag. Through interactive experimentation and visual reinforcement, learners gain a deeper understanding of concepts the effect of air resistance, and the difference between theoretical and real-world motion. This is suitable for JC1’s topic on projectile motion. It can also be used for Upper Sec, if you change the launch angle to 90 degrees.

Interactive System Schema Generator

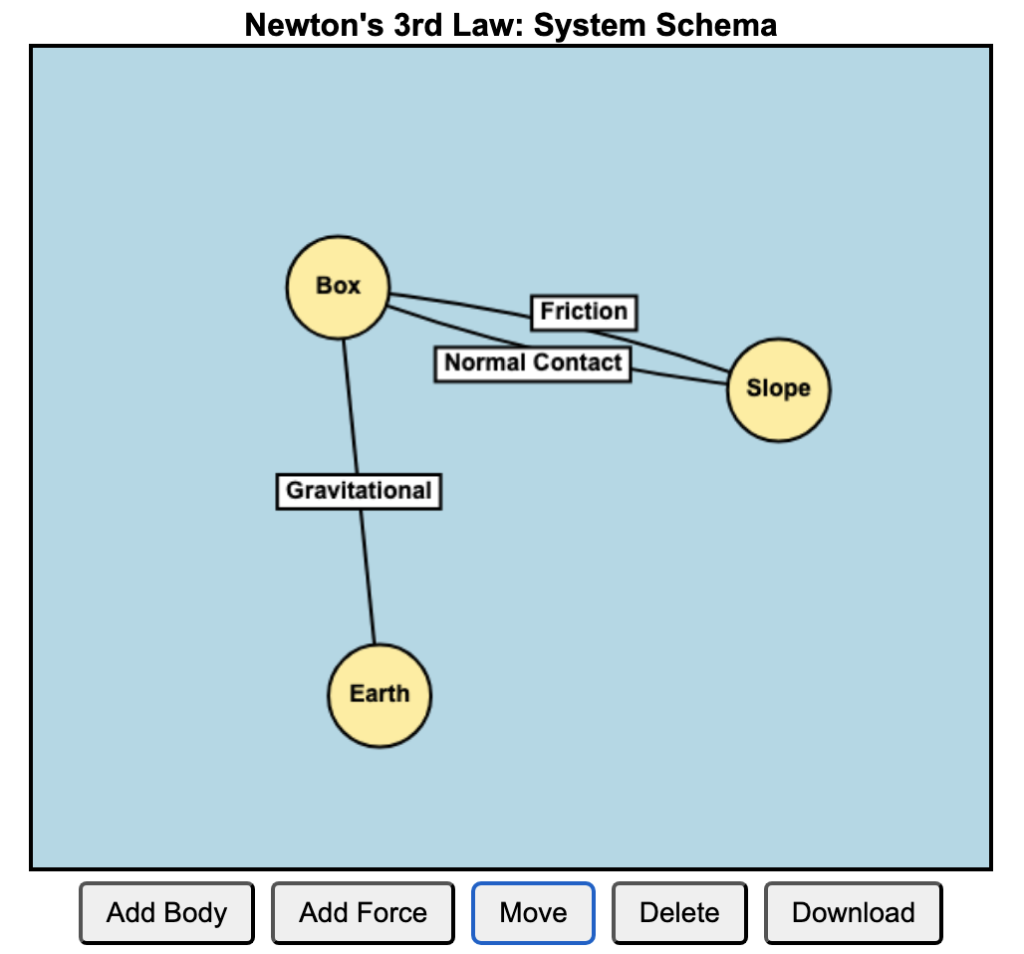
I built this web app to help students draw system schemas, having blogged about this before.

It is also available and optimised for download for SLS.

Basic Instructions

To add Bodies:

  • Click the “Add Body” button.​
  • Click on the canvas to place the body at your desired location.​
  • Label the Body.

Add Forces:

  • Click the “Add Force” button.​
  • Click on two bodies that exert the force on each other.​
  • Label the Force.

Using System Schema to Understand Newton’s Third Law

Newton’s Third Law states that when Body A exerts a force on Body B, Body B exerts an equal and opposite force on Body A. While this principle is conceptually simple, many students struggle to apply it consistently across different physical scenarios. The System Schema approach provides a powerful way to visualise and analyse these interactions. It is a representation tool developed by The Modeling Instruction program at Arizona State University (Hinrichs, 2004).

A system schema is a diagram that represents objects (as circles) and interactions (as lines) between them. Instead of focusing on individual forces, a system schema helps students see the relationships between objects before applying force diagrams. This method emphasizes Newton’s Third Law by explicitly showing how forces come in pairs between interacting objects.

To correctly identify action-reaction force pairs, consider the following guidelines:​

  1. Forces Act on Different Objects: Each force in the pair acts on a different object. For example, if Body A exerts a force on Body B, then Body B simultaneously exerts an equal and opposite force on Body A.​
  2. Forces Are Equal in Magnitude and Opposite in Direction: The magnitudes of the two forces are identical, but their directions are opposite.​
  3. Forces Are of the Same Type: Both forces in the pair are of the same nature, such as gravitational, electromagnetic, or contact forces.

The steps to applying System Schema to Newton’s Third Law are as follow:

  1. Identify the bodies in the system – Draw each object as a separate circle.
  2. Represent interactions – Draw lines between bodies to indicate forces they exert on each other (e.g., a box on the ground interacts with Earth through gravitational force).
  3. Label force pairs – Each interaction represents an action-reaction force pair (e.g., a hand pushes a wall; the wall pushes back).
  4. By mapping forces this way, students can easily recognize that forces always act between bodies and in pairs, reinforcing the symmetry of Newton’s Third Law.

One of the most common misconceptions of students is that normal contact force and gravitational force acting on a body are action-reaction pairs because they are equal and opposite in a non-accelerating system. By using the system schema, they can see that the two forces involve interaction with different bodies, e.g. the floor of an elevator for normal contact force, and the Earth for gravitational force.

Interactive Graph with Javascript

I was experimenting with using generative AI to create an interactive graph that could be used to amend the animation of a moving particle, for the topic of kinematics. Students are able to move the four points on the velocity time graph to manipulate the movement. I kept the graph to straight lines between each point to keep things simple.

The vertical axis toggles between displacement and velocity. This will be yet another way for students to learn about how the velocity-time graph affects motion. I have found that many students are confused between displacement and velocity. The app’s ability for them to vary the velocity graph and then make predictions of the resulting displacement graph and the movement should be worth the effort.

Random displacement and velocity simulation

Oftentimes, the kinematics graphs that students see in their textbooks are very clean and simple. In nature, movement is often haphazard and to simulate such movement in one dimension, I generated this (https://physicstjc.github.io/sls/random-displacement/index.html) using ChatGPT 4o.

There is a drop-down menu that allows users to toggle between displacement and velocity graphs.

In a displacement-time graph, the displacement is plotted on the y-axis and time on the x-axis. A positive displacement represents a position to the right of the origin while a negative displacement is to its left. The slope of this graph represents the object’s velocity; a steeper slope indicates a higher velocity. A positive slope means the object is moving forward, a negative slope indicates it is moving backward, and a zero slope shows the object is at rest. For example, in uniform motion, the displacement-time graph is a straight line with a constant slope, reflecting constant velocity.

Conversely, in a velocity-time graph, velocity is on the y-axis and time on the x-axis. The area under the velocity-time graph represents the object’s displacement. Areas above the time axis denote positive displacement, while areas below indicate negative displacement.