Teaching Resources

Physics teaching resources

Cardboard Boomerang

A indoor boomerang can be constructed using 3 strips of cardboard put together. Throwing it may require some practice though but when you get the hang of it, it can inject great fun into your lesson. You can explore using different types of material to get the best boomerang.

Materials

  1. Cardboard about 1 mm thick, of suitable rigidity
  2. Staples
  3. Scissors
  4. Rubber band or tape for added weight

Procedure

Cardboard boomerang for science demonstration
Cardboard strip with a slit cut
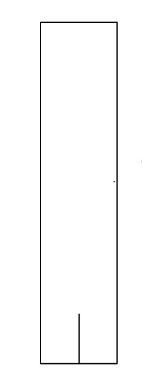
  1. Cut 3 equal rectangular strips of cardboard measuring 12 cm x 2.5 cm. You may like to trim the sharp corners on one of the ends of each strip.
  2. Cut a slit of 1.5 cm along the middle of each strip, on the untrimmed end.
  3. Join the strips together at the slits, the angle between two adjacent strips being 120 degrees.

    cardboard boomerang
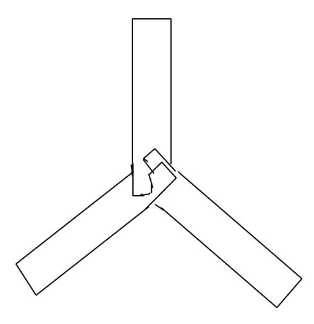
    3 strips of cardboard overlapping each other
  4. One side of the slit should overlap another so that it looks like the above:
  5. Staple the overlapping centre together.
  6. The boomerang is ready for use! Throwing the boomerang is done by holding onto one of the wings. The boomerang should be almost vertical, at an angle of about 10o. With a flick of the wrist, spin the boomerang as it leaves the hand. The direction of spin should be toward the side that is tilted up.

Science Explained
A boomerang requires a centripetal force to cause it to fly in a circular path back to the thrower. This centripetal force comes from the lift that the wings generate as they cut through the air.

Tuning a Guitar using Resonance

There are many ways to tune a guitar. Many musicians would have tuned a string instrument using a tuning fork at some point. However, the conventional method of tuning with a tuning fork is by listening to beats while adjusting the tension of the string. The tuning fork is of a known frequency which corresponds to a note. For instance, 440 Hz corresponds to an A-note. When the A-note string is slightly out of tune, such as having a frequency of 438 Hz, the resulting sound pattern (called beats) will have a frequency that is the difference between the two frequencies, i.e. 2 Hz. Hence, the aim of tuning by listening to beats is to adjust the tension of the string until the beats disappear.

An alternative method, which is the one we shall attempt in this demonstration, is to run the vibrating tuning fork along the E-string (this first from the top) until you reach the bridge between the 5th and 6th frets. You should expect to hear a loud resonating sound there. Otherwise, adjust the tension until you do.

All the other strings are tuned with respect to that first string.

Explanation

Resonance is the phenomenon where the frequency of the tuning fork (driving frequency) is equal to the frequency of the string (natural frequency) and maximum energy is transferred from the tuning fork to the string. The string will hence oscillate with the maximum amplitude.


Water Bender

A thin stream of water can be easily bent using a plastic comb or ruler which was previously rubbed with wool. This demonstrates the attractive forces between unlike charges.

Materials

  1. Plastic ruler
  2. Wool
  3. Water from a tap

Procedure

  1. Turn on the faucet for the thinnest stream of water with a consistent flow.
  2. Rub the plastic ruler with the wool.
  3. Place the part of the ruler which was rubbed near the stream of water without touching.

Science Explained

Water molecules are polar in nature, which means that one side (where the oxygen atoms are) is more negative while another side (where the hydrogen atom is) is more positive. When wool is rubbed with plastic, it deposits electrons on the ruler.

The electrons will remain on the plastic as it is a poor conductor of electricity. When placed near the stream of water, the water molecules reorientate themselves such that the positive pole of each molecule is now nearer to the ruler than the negative pole.

The resulting attractive forces are stronger than the repulsive forces as the forces between charges decrease when the distance apart increases.

Electromagnet

Materials

  1. Insulated wire (about 1 m in length)
  2. Iron nail (at least 5 cm in length)
  3. 1.5 V battery
  4. Adhesive tape
  5. Small metal paper clip

Procedure

  1. Test that the iron nail is not already magnetised by trying to pick up the metal paper clip with it.
  2. Strip the two ends of the wire off its insulation. Leave about 1 cm bare on each end.
  3. Coil the wire around the iron nail, pushing each coil tightly together, to make a solenoid. Make sure you leave about 5 cm free at each end of the wire in order to connect the battery to the solenoid.
  4. If there is excess wire, make a second layer of coils around the first layer.
  5. Connect the ends of the wire to the terminals of the battery.
  6. Test the solenoid now by picking up the paper clip.

Leyden Jar

A Leyden jar is a device used to store static electric charge. It can be used to conduct many experiments with electricity such as creating a spark across a gap.

(more…)

Resonating Pendulums

The purpose of this demonstration is to teach the conditions and effects of resonance.  Our setup includes three sinkers hanging from a rod. I give credit to my colleague Alan Varella for showing me this demonstration when I first started teaching.

What I do with my class is that I would jokingly announce that I can use telekinesis to cause any sinker to oscillate at will while keeping the others still. This provides some entertainment and after I do the first demonstration, I can even challenge one of them to try to do the same or ask the class for suggestions on how the phenomenon can be repeated.

Materials

  1. 3 fishing sinkers or pendulum bobs,
  2. Some nylon string,
  3. A rod of about half a metre’s length.

Procedure

  1. Tie each sinker to a piece of string of varying length and then tie the string along the rod at roughly the same distance apart.
  2. By holding the rod at one end so that the three sinkers dangle in front of your hand, you can begin to move the rod slightly and slowly at first. The hand should be moving so little that it goes unnoticed.
  3. Gradually increase the frequency of the slight hand movement and when you see the sinker with the longest line begin to start oscillating with larger amplitudes, stay at that frequency.
  4. Once you are satisfied with the oscillation of the first sinker, you can try obtaining resonance with the other two by starting over again with a higher frequency this time.

Science Explained

Resonance occurs when the frequency that you are driving the rod with is now equal to the natural frequency of the sinker on a line. Meanwhile, the other two sinkers do not oscillate as obviously as the one with the longest line.

Resonance is the tendency of a system to oscillate at larger amplitude at some frequencies than at others. A simple example will be a child on a playground swing being pushed by her friend standing at one end of the swing. If the friend pushes the child on the swing every time the swing reaches one end, more energy is being introduced each time, causing the child to swing higher and higher. Notice that a swing will always oscillate about the same frequency, with the weight of the child making little difference. At these natural frequencies of oscillation, even small periodic driving forces can produce large amplitude oscillations.

For the case of the sinker-and-line system, the frequency f at which resonance takes place for each sinker should be given by the formula

$$f={\frac{1}{2\pi}}\sqrt{\frac{g}{L}}$$

where g is the gravitational acceleration and L is the length of the line.

Hence, the pendulum with the longest string will resonate at the lowest frequency among the three.